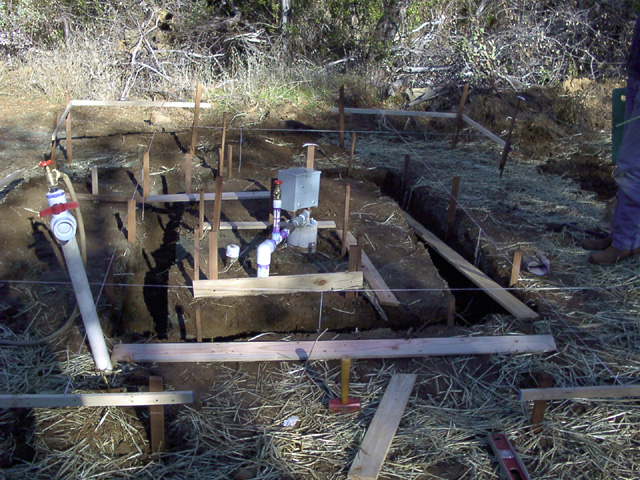
 This dictates that the structure should be oriented with the walls exactly
North, South, East, and West, and the entrance should be on the East. We
used our surveying equipment to lay out the exact location and orientation
of the foundation and walls, and determined true North by sighting Polaris.
Polaris is actually about 3/4 of a degree off of true North, so we used an
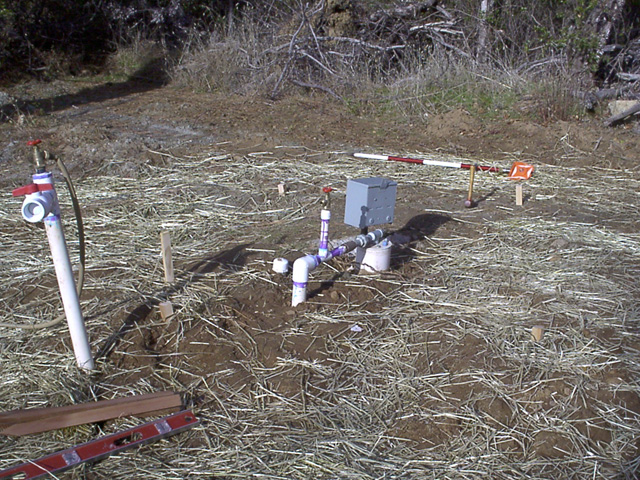
ephemeris to correct to less than one minute of arc.Here is the well as we
began laying out the location, and with the foundation dug. (The pipe sticking
up on the left is a hydrant that will be outside of the house.) Click on
any photo for a larger version.
This dictates that the structure should be oriented with the walls exactly
North, South, East, and West, and the entrance should be on the East. We
used our surveying equipment to lay out the exact location and orientation
of the foundation and walls, and determined true North by sighting Polaris.
Polaris is actually about 3/4 of a degree off of true North, so we used an
ephemeris to correct to less than one minute of arc.Here is the well as we
began laying out the location, and with the foundation dug. (The pipe sticking
up on the left is a hydrant that will be outside of the house.) Click on
any photo for a larger version.
Besides housing the well and electrical equipment, we wanted a little space
in the building to store other things. We thought it would be nice
to have the dimensions of the room in the golden ratio, so we chose 5 feet
by 8 feet as the size. (8/5 = 1.6, golden ratio = 1.618)
 Fires are not unknown in the area, so we wanted a structure that was mostly
fire-resistant. We decided to build a concrete block structure with a steel
door.
Fires are not unknown in the area, so we wanted a structure that was mostly
fire-resistant. We decided to build a concrete block structure with a steel
door.
The next step was pouring the concrete foundation and floor. Concrete blocks are heavy, so they need a good foundation. No cement-truck delivery for this remote location, down a 4WD path. We trucked in a couple of loads of cement ourselves.
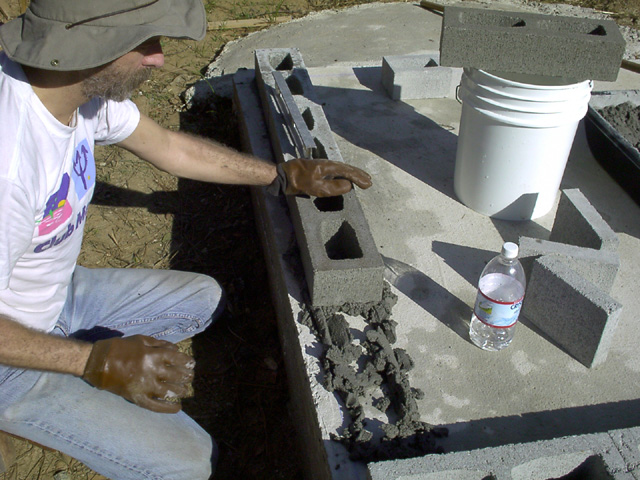 We looked into steel frames for the door, but they cost hundreds of dollars
more than wood frames. For the cost of a steel door in a steel frame, we could
buy a steel door in a wood frame, and have enough money left over to replace
it if it burns. Here is Charlie laying the first course of concrete blocks.
We looked into steel frames for the door, but they cost hundreds of dollars
more than wood frames. For the cost of a steel door in a steel frame, we could
buy a steel door in a wood frame, and have enough money left over to replace
it if it burns. Here is Charlie laying the first course of concrete blocks.
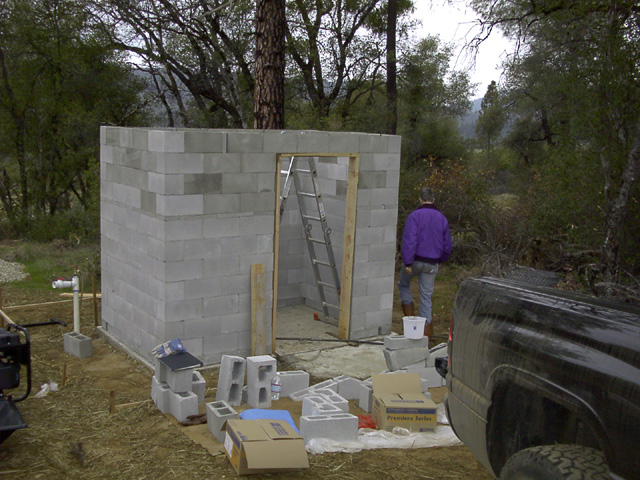
 In this method, blocks are stacked up without any mortar (much easier!).
Then, a coating is applied to both surfaces of the wall, similar to plastering.
The surface bonding mixture contains (among other things) cement to bond to
the blocks, and fiberglass fibers to strengthen the surface. A wall built
this way is actually stronger than one built using traditional mortar, since
mortar has little adhesive strength. Easier and stronger - sounded good to
us. See USDA Agricultural
Research Service Agriculture Information Bulletin No. 374
and this project
description from Quikrete
for more information. You might also check out standard C946, available
from ASTM International
for a fee. We had to special order the surface bonding mix from a Quikrete
dealer. These photos show the building before and after the surface bonding
was applied. (That's Charlie's cowboy hat behind the building.)
In this method, blocks are stacked up without any mortar (much easier!).
Then, a coating is applied to both surfaces of the wall, similar to plastering.
The surface bonding mixture contains (among other things) cement to bond to
the blocks, and fiberglass fibers to strengthen the surface. A wall built
this way is actually stronger than one built using traditional mortar, since
mortar has little adhesive strength. Easier and stronger - sounded good to
us. See USDA Agricultural
Research Service Agriculture Information Bulletin No. 374
and this project
description from Quikrete
for more information. You might also check out standard C946, available
from ASTM International
for a fee. We had to special order the surface bonding mix from a Quikrete
dealer. These photos show the building before and after the surface bonding
was applied. (That's Charlie's cowboy hat behind the building.)The trickiest thing about surface bonding is the size of the blocks. A concrete block that is nominally 8" high and 16" long actually measures 7 5/8" by 15 5/8". When built with a 3/8" mortar joint, the size comes out even. When using surface bonding, there is no mortar joint and the size comes out odd. For example, two half blocks don't equal one whole block. We went through several designs to get the right size openings for the door and window with a minimum of cutting blocks. Of course, Charlie is a whiz at math, so doing this design wasn't an obstacle.
The blocks above the doorway obviously have nothing under them for support. (The door frame isn't structural.) We built a lintel using bond beam blocks filled with cement and rebar.
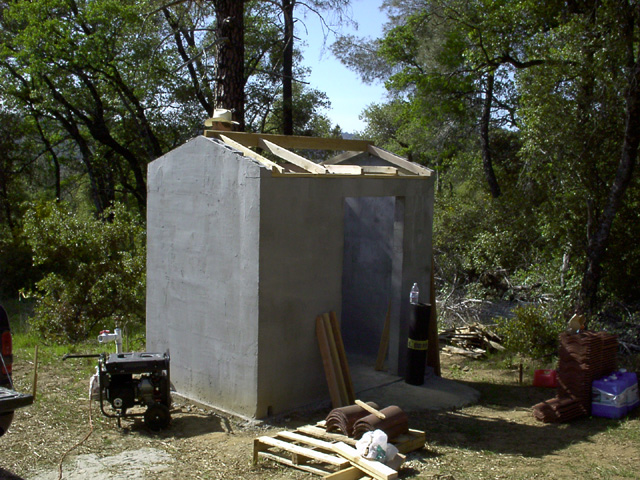
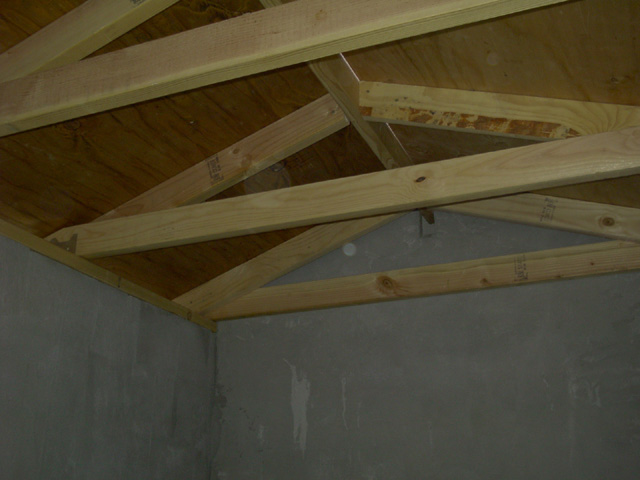 Charlie is tall, so we didn't skimp on the height. We could not find any
design for the roof structure that didn't use wood framing. We hope the wood
frame roof is high enough off the ground to escape low fires. The previous
photo shows the roof framing under construction. Here is the roof framing
and plywood deck as seen from the inside. You can also see the top plate,
the wood piece at the top of the wall. It's secured using bolts embedded
in concrete poured into the blocks. Not shown are soffit vents to allow air
circulation.
Charlie is tall, so we didn't skimp on the height. We could not find any
design for the roof structure that didn't use wood framing. We hope the wood
frame roof is high enough off the ground to escape low fires. The previous
photo shows the roof framing under construction. Here is the roof framing
and plywood deck as seen from the inside. You can also see the top plate,
the wood piece at the top of the wall. It's secured using bolts embedded
in concrete poured into the blocks. Not shown are soffit vents to allow air
circulation.
 We chose a roof covering of tile to protect from airborne embers. Under the
tile is a double layer of felt, and battens, staggered to allow drainage in
case water gets under the tiles. Note the holes at the bottom corners of
the building. Since this is after all a well house, we thought it
important to allow for drainage in the event there is a flood due to some
malfunction. The holes are actually gaps due to the mismatch between the
6 inch thickness of the wall and the 8 inch modular measurement of the blocks.
We turned the gaps into a virtue. The holes are covered with screen to keep
critters out. The holes later proved their worth when the well pump was left
on and the building was flooded.
We chose a roof covering of tile to protect from airborne embers. Under the
tile is a double layer of felt, and battens, staggered to allow drainage in
case water gets under the tiles. Note the holes at the bottom corners of
the building. Since this is after all a well house, we thought it
important to allow for drainage in the event there is a flood due to some
malfunction. The holes are actually gaps due to the mismatch between the
6 inch thickness of the wall and the 8 inch modular measurement of the blocks.
We turned the gaps into a virtue. The holes are covered with screen to keep
critters out. The holes later proved their worth when the well pump was left
on and the building was flooded.
Here is the completed well house.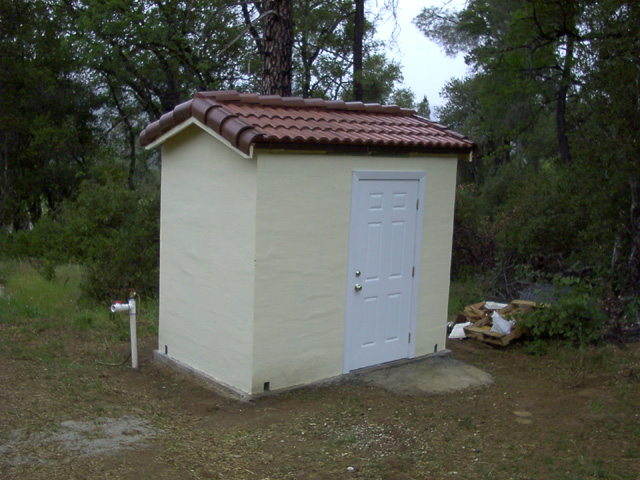
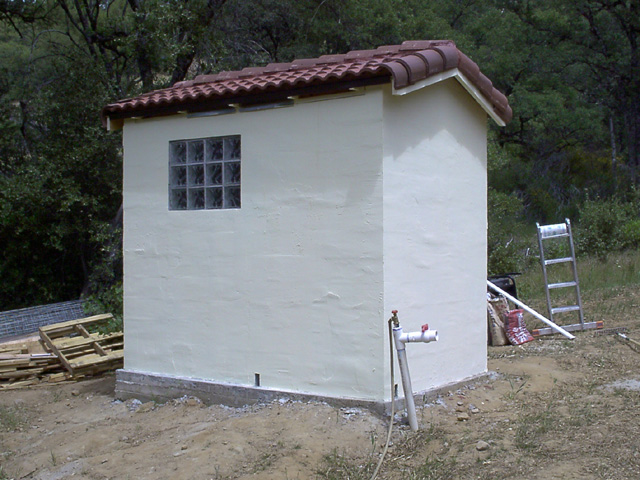 We wanted a window to let in natural light, but again, we wanted to avoid
wood. We decided on a glass block window, giving an elegant, if retro, touch.
We wanted a window to let in natural light, but again, we wanted to avoid
wood. We decided on a glass block window, giving an elegant, if retro, touch.
Total project cost: $1900 and about 26 man-days.